
Here is the free pattern for them :D
Materials
About 120g (short socks) or 150g (longer socks) of Bendigo woollen mills colonial or any 8ply wool
Set of 4 4.5mm DPNs
Cable needle
Two stitch holders
Tapestry needle
Sizing
These socks are made to fit a men's size 11 foot. If you are making them for smaller feet use slightly thinner wool like thick sports weight yarn and substitute 3.5 needles instead.
Pattern notes
*When joining wool use the split splicing method. This will help you to avoid lumpy bits in the stitch pattern and save you time because there will be no ends to weave in. Just make sure you felt the ends together really well to avoid breaks.
*M1L: Insert left needle into horizontal bar between the two stitches from front to back. Using the right needle knit through the back of that stitch. Here is good tutorial on how to do this increase: Kategilbert.com
*C4B: slip 2 sts onto a cable needle and hold at back of work, knit next 2 sts from left hand needle, then knit sts from the cable needle.
*C4F: slip 2 sts onto a cable needle and hold at front of work, knit next 2 sts from left hand needle, then knit sts from the cable needle.
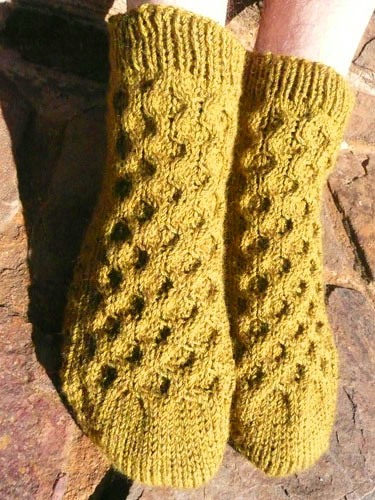
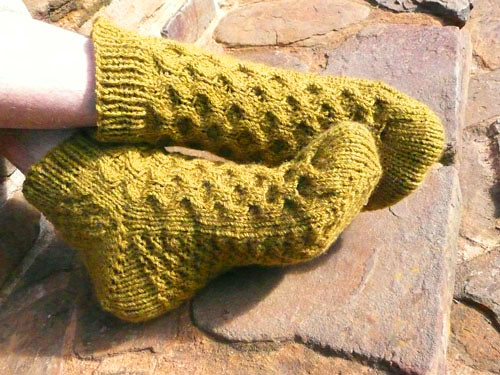
Honeycomb cable (worked over the 28 sts that make up the front of the sock)
Row 1: k2*C4B, C4F; rep from * to last 2 sts, k2
Row 2: knit
Row 3: knit
Row 4: knit
Row 5: k2 *C4F, C4B; rep from * to last 2 sts, k2
Row 6: knit
Row 7: knit
Row 8: knit
Rep these 8 rows
Lichen st (worked over the 28 sts that make up the bottom of the sock)
Row 1: k1, p2, *k2, p2 rep from * to last st, k1
Row 2: Same as row1
Row 3: k3 *p2, k2, rep from * to last st, k1
Row 4: Same as row 3
Rep these 4 rows
Pattern
Toes:
CO 12 sts on each needle (24sts in total, 2 needles) using the figure 8 cast on method.
A tutorial on how to do this can be found here: Helloyarn.com
Knit one round in St st putting the first 12 sts of the row on one needle and sharing the other 12 sts between 2 needles. This will help you recognise where the start of a round is. You could also use a stichmarker for this.
Next round: *k1, M1L, knit to last st on that needle, M1L, k1 rep from * around.
Next row: knit
Continue in this manner until you have 28 sts on each needle, (56 sts altogether) ending on a plain knit round.
Foot:
Next round: work cable pattern across first 28 sts(front of sock, needle 1), then work lichen st over the next 28 sts (back of sock, needles 2 and 3).
Continue in pattern until you have enough to comfortably reach the ankles.
I worked 10 repeats + an extra 4 rounds in pattern. End on either row 4 or row 8 of the the repeat.
Short row heel:
The heel is worked over 28 sts, keep working with sts on two needles as this puts less strain on the front of the sock. I suggest putting the sts from needle 1 (front of sock) onto two stitch holders while you work the heel, it will really help.
Last row (4th or 8th row of repeat): work cable panel as usual, then work lichen in pattern to the last st. Turn work.
2. On the wrong/purl side, yarn over and purl all sts until one st remains. Turn.
3. On the right/knit side, yarn over and knit up to the stitch/yarn over pair. Turn.
4. On the wrong/purl side, yarn over and purl to the first st/yo pair. Turn.
5. Repeat steps 3 and 4 until you needles look like this: 1 st, 8 st/yo pairs, 10 sts, 8 st/yo pairs, 1 st. This occurs on a k row.
6. K to the first st/yo pair. k1 (st from the st/yo pair), K2Tog (joining the yarn over to the knit stitch
in the next st/yo pair). Turn.
7. On the wrong/purl side, yarn over and purl to the first st/yo pair. p1 (st from the st/yo pair), SSP
(joining the yarn over and the purl st in the next st/yo pair). Turn.
8. On the right/knit side, yarn over and knit to the first yo and K3Tog (knit 2 yarn overs and knit stitch
in the following stitch together). Turn.
9. On the wrong/purl side, yarn over and purl to the first yo. SSSP (purl 2 yarn overs and the
following stitch together). Turn.
10. Repeat instructions 8 and 9 until the last stitch on each end is consumed (1 yo and 28 sts). This is
a wrong/purl side row.
11. On the right/knit side, yarn over and knit up to the last remaining yarn over on the set of heel
stitches. Slip this stitch over to the needle holding the instep stitches. K2Tog. This counts as the
first stitch in round 1 of the honeycomb cable pattern.
12. Knit across the instep (needle 1) in the Honeycomb cable pattern, up to the last stitch. Place the last
yarn over remaining from the heel needle on the needle with the last remaining instep stitch and
SSK the two stitches together. Knit in lichen st to end of round.
Leg:
Now you can continue in pattern until the socks are about an inch shorter than you would like them to be. For these socks I worked 3 repeats and then started the ribbing. End on either the 4th or 8th repeat.
Ribbing: k1, p1 to end of round
rep this row 7 times, 8 times in total.
Cast off loosely and weave in all ends securely.
Hope you enjoy making this sock! :) If there are any errors please let me know and I will gladly clear up up and confusion.

4 comments:
verry cool! Thanks!
Great socks! Thanks for the pattern!
--Anna (Diary of an Eccentric)
Thank you for this pattern - I found it via Ravelry. And am about to embark on it! How is your spinning going? And what have you been doing since you last posted?
Have just seen your lovely beret pattern - I might just have to make that too...
Hugs, Jasmine (in Newstead since it sounds like you aren't very far from me!!!)
Hey, thanks for the pattern! I'm posting it to needles at this very moment just in time for the holidays!
Post a Comment